Amarillo Ale

>> Wednesday, December 06, 2006

I recently brewed James Spencer's Amarillo Ale (of Basic Brewing). I've been wanting to brew this beer ever since seeing James and his buddy Steve Wilkes raving about it...I think it was on one of their podcasts. They definitely made it sound good and worth brewing. What sealed the deal was a recent trip to Red Rock Brewing Company. I enjoyed a couple pints of their Harvest Ale and I was commenting to the waiter how much I liked it. He informed me it's only available once a year, and it's brewed with Amarillo Hops.

I believe the recipe is in the DVD's, but I also found it on on bigfoamyhead.com.

The recipe from bigfoamyhead.com:

10 lbs Rahr 2-row pale
1 lb Briess Caramel 60L
1 oz Amarillo Hops 60 mins
1/2 oz Amarillo Hops 15 mins
1/2 oz Amarillo Hops 5 mins
WL California Ale
Anticipated results: OG 1.050 - FG 1.007. ABV=5.7%

The following is the recipe as I made it:

10 lbs Great Western 2-row pale
1 lb Briess Crystal 60L
1/2 oz Cascade Hops 60 minutes
1/2 oz Fuggles Hops 60 minutes
1/2 oz Amarillo Hops 15 mins
1/2 oz Amarillo Hops 5 mins
1 oz Amarillo Hops dry hopped in the secondary
White Labs WLP001 California Ale

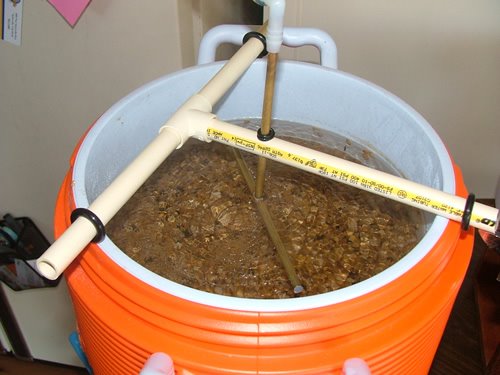
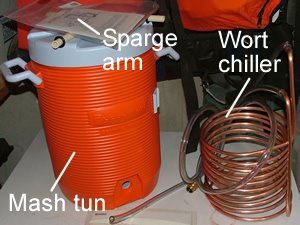
I used a single infusion mash at 154 degrees farenheit for 60 minutes. As you can see, the original recipe called for Amarillo hops as both the bittering hops and the flavor/aroma hops. After I caught a whiff of the very fragrant Amarillo hops, I decided I'd rather use some leftover Cascade/Fuggles hops for bittering, and save the 1 oz of Amarillo for dry hopping in the secondary.

It's still in the secondary right now and I can't wait to give it a try. Oh, and I forgot to take a OG reading on this batch, so I don't really know if I hit the target OG. Thanks to Steve Wilkes suggestion, I'm using honey for my priming sugar from now on.


Rating: B+

Read more...

All Grain Brewing Equipment

>> Saturday, November 25, 2006

Here's the list of parts I used to build my all grain system:
(2) 5 Gallon Rubbermaid coolers from Sam's Club @ $18.64 each
(2) 1/2 stainless steel ball valves from Badger Tools @ $7.03 each
(2) Stainless steel couplers, part #4464K214 from McMaster-Carr @ $4.19 each
(2) Stainless steel nipples, part #4830K171 from McMaster-Carr @ $2.01 each
(2) Brass locknuts, part #50785K144 from McMaster-Carr @ $1.92 each
(2) Kynar barbed fitting, part #53055K221 from McMaster-Carr @ $2.75 each

Lessons learned: The nipples were too short so I wasn't able to use the locknuts. As a result, the bulkhead wasn't as tight of a fit as I would have liked. Occasionally I'll get a drip or two leaking past the bulkhead assembly. Not a big deal, but I'd recommend using a slightly longer nipple, perhaps part #4830K172 from http://www.mcmaster.com/ as I think this would probably provide a better seal.

Assemble the parts per the diagram below for both your hot liquor tank (HLT) and your mashtun. You'll also want to install some kind of false bottom in your mashtun. I use a section of stainless steel mesh (from the outside of a stainless steel water supply line) attached to a 1/2 male threaded copper fitting. The copper fitting is screwed into the coupling and the stainless steel mesh is attached to it.

After you figure in shipping costs, you should be able to build these for pretty close to $40 each or $80 for the whole system. Most of the comparable commercially available systems sell for about $180 and up, so there's potential to save quite a bit of money by building this yourself.

Read more...

Sierra Nevada Pale Ale Clone 1

>> Saturday, November 11, 2006


I've picked up some new equipment. I broke down and purchased an 8 gallon stainless steel kettle and an oxygen system both from Beer, Beer, & More Beer. The kettle is great because now I'm able to do a full boil resulting in better hop utilization. The oxygen system is used to oxygenate the wort after the boil. This helps the yeast get off to a better start decreasing the lag time between pitching and active fermentation.

Sierra Nevada Pale Ale Clone:


9 pounds, U.S. 2--row pale malt
1/2 pound, crystal malt (60L)
1/4 pound, cara-pils malt
1 ounce, Perle (alpha 6.5), (60 minute boil)
1/2 ounce, Cascade (alpha 6.3) (15 minute boil)
1/2 ounce, Cascade dry hopped in the primary
Wyeast 1056 American Ale yeast

Mash at 153/5 degrees F. Hop according to schedule above. Chill and pitch. This batch spent about 4 days in the primary, 5 days in the secondary, and now it's been kegged and primed with 2/3 cup of honey.

Recipe Feedback 12/06/2006
Sierra Nevada Clone - I liked this one quite a bit. It wasn't quite as hoppy as I would have liked, but it is really good. This is probably my favorite brew so far. I'll definitely make this one again.


Rating: A-/A

Read more...

Jeff's Brown Ale

>> Saturday, August 19, 2006

I'm posting this a little late, but I did my first all-grain batch on 08/13/2006. The recipe I chose was Jeff's Brown Ale. I chose this recipe because it was relatively simple and the guys at Basic Brewing Radio seemed to really like it. I did have to modify the recipe slightly because of availability of ingredients at my local brew shop. Here's the recipe as I made it:

Yield: 5 Gal.
OG: 1.044
IBU: 41.7
SRM: 22.6

Specialty Malts:
1.00 lb. Briess Crystal 60L
0.50 lb. Briess Chocolate Malt

All Grain Base:
9.25 lbs. Maris Otter Pale 2 Row

Hops:
1 oz. Centennial @ 60 Minutes 8.1AAU
0.5 oz. Fuggles @ 20 Minutes 4.2AAU
0.25 oz. Fuggles @ 5 Minutes 4.2AAU
0.25 oz. Fuggles 4.2AAU dry-hopped in secondary

Yeast:
White Labs WLP002 English Ale

All in all the process was much more simple than I had anticipated. As far as lessons learned:

1. I thought I'd heated enough water for the hot liquor tank. When I went to pour it in, it turned out I'd only boiled about 4 gallons worth, which seemed to not be quite enough.
2. I'm still using my water-bath canner as my boil kettle. It's not large enough to do a full boil; bite the bullet and buy a bigger kettle.
3. In all the excitement, I forgot to do my iodine test to make sure all the starches had been converted to sugars.
4. I had a very small amount of leaking around the ball valves on the mashtun and HLT. I'd guess maybe a drip or two or three from each. Not a big deal, but I may need to redesign the bulkhead attachment slightly.

Here's an overview of the process and a couple pics:

1. I heated 11 quarts of water to 170 degrees Fahrenheit and poured the water into my mashtun.
2. I slowly added the grain to the mashtun, stirring to avoid dough balls. I checked the temperature in the mashtun and it was 151 degrees.
3. Put the top on the mashtun and let it sit for an hour.
4. Heated sparge water to 170 and poured it into my HLT. The HLT was then placed on top of my fridge, the mashtun on the kitchen table, and the kettle on the kitchen floor.
5. Connected my sparge arm to the HLT. Opened the ball valve on the mashtun and collected the first runnings. They were extremely clear and did not appear to contain any husks.
6. I gently returned the first runnings to the mash tun so as not to disturb the grain bed.
7. Opened the ball valve on the HLT and began sparge. Was able to match sparge inflow to mashtun outflow fairly closely.
8. Once the brew kettle was full, it's basically the same as making an extract batch.

The HLT


The Mashtun


Sparging


Brew Kettle


Notes:
08/14/2006 morning - Slow bubbling in air lock; approx one per 2-7 seconds
08/14 evening - continuous bubbling
08/15 morning through 08/16 evening - continuous bubbling
08/18 evening - bubbling slowed to one per 30+ seconds; racked to secondary
08/19 morning - decided to dry hop with remainng .25 oz of fuggles. I'd never tried dryhopping before. I figured I'd give it a try and start with a relatively conservative amount.

Recipe Feedback 12/06/2006
I liked this one quite a bit. It's definitely a dark fairly strong ale. My wife said it reminds her of coffee.


Rating: C+/B-

Read more...

Some New Equipment

>> Saturday, August 05, 2006


Here's some of my new equipment for my switch to all grain brewing: a Rubbermaid cooler for my mash tun, a wort chiller, and a Phil's sparge arm. Just a tip, if you're planning on building your own mash tun, Sam's Club is selling the 5 gallon water cooler for $18.64 (item #918901). This is by far cheaper than I've seen them anywhere else. I've seen some online retailers charging as much as $50 for these. The mashtun will be getting some stainless steel plumbing fittings. I've ordered them but haven't received them yet. Assuming they fit and don't leak, I'll provide a parts list. FYI, the parts were quite a bit cheaper than most of the packaged cooler conversion kits I've seen.

Read more...