Showing posts with label Food. Show all posts

Shrimp Ceviche

>> Thursday, July 17, 2025

Another food recipe today. Pretty much anytime we see ceviche on the menu at a restaurant, we’ll order it. There was an awesome food truck and restaurant back in Utah called La Cevicheria that made some incredible ceviche. Carvor's Fish House/Jensen Brothers, one of our favorite local seafood places in Dunedin, FL makes ceviche every Sunday and it’s been a staple for us on Sunday pool days. I figured I’d try making my own and it turns out it’s really easy and a lot cheaper to make it yourself.

A couple notes, the first time I made this I used Roma tomatoes and I felt like there wasn’t enough liquid. The second time I made it I used “Flavor Bomb” cherry tomatoes and it was much better. So I’d recommend using something other than Roma, or perhaps one Roma along with another variety with more juice. This recipe uses lime juice to cook/cure the shrimp. If you’re not comfortable with that, you can blanch the shrimp in boiling water for 2 minutes, then put them in an ice bath. If you go this route, blanch them then cut up the shrimp, then marinate in lime juice. Lastly, use tostadas or a thickish tortilla chip. A thin tortilla chip is probably going to be too delicate to scoop up the ceviche.

Ingredients 
1 cup fresh squeezed lime juice (~10 limes)
1# shrimp (frozen or fresh), peeled, deveined, and tails removed 
3/4 to 1 cup tomatoes, diced (~2 smallish medium sized tomatoes)
1/4 to 1/3 cup cucumber, peeled and diced
1 jalapeƱo, diced
1/2 medium onion, diced 
1/4 to 1/3 cup cilantro, chopped 
Salt and pepper to taste

Process 
  1. Wash the shrimp under cool running water and allow to drain. 
  2. Cut shrimp into bite size pieces (I usually do thirds).
  3. Juice limes.
  4. In a glass bowl, combine shrimp and lime juice, cover with plastic wrap and marinate in the fridge for 30 minutes. Make sure the shrimp are fully submerged in the juice; I like to give it a stir halfway through.
  5. Combine tomatoes, cucumber, jalapeƱo, onion, and cilantro in a bowl.
  6. Drain the shrimp, reserving 3-4 tablespoons of the lime juice.
  7. Add shrimp and reserved lime juice to vegetables and combine well.
  8. Season to taste with salt and pepper.
  9. Serve and enjoy.

Read more...

Smoked Candied Salmon

>> Tuesday, April 15, 2025

This is a great recipe I stumbled across years ago. I haven’t been able to find it again, so I’m not sure who to give credit to. This became a favorite of most of my kids, which says quite a bit for a fish recipe. Usually you’ll want to use a mild smoking wood like alder or a fruit wood. That said, I’ve even used hickory and really liked the results. Here it is as I make it:

You’ll need one 2.5 to 3# salmon filet

Marinade 
1c Brown sugar, packed
1c Water
3/4c Soy sauce
2 Garlic cloves — minced or finely chopped 
1t Ginger — fresh, chopped

Process 

  1. Mix the marinade ingredients together in a non-reactive pan and bring to a boil. Reduce the heat and simmer for 5 minutes. Remove from heat and allow to cool.
  2. Cut the fillet into half pound sized pieces. Put the salmon in a non-reactive container (plastic, glass, zip-lock bag) and add the cooled marinade. Let the salmon marinate for 48 hours in the fridge.
  3. When you are ready to cook, bring your smoker up to temp…if your smoker can do it, shoot for 180F, otherwise go with 220-230F.
  4. Add a generous amount of fresh ground black pepper to the salmon.
  5. Place the salmon – skin down – on a sheet of heavy duty aluminum foil in your smoker.
  6. Cook until the salmon reaches 125F degrees in its thickest spot or until the edges are brown and the inside is opaque. I actually cook mine a little longer and render out more oil/fat. I basically cook it until the whole filet flakes easily with a fork … which I’m sure would really upset some true salmon connoisseurs, but that’s the way I like it. If your smoker can do 180F, feel free to increase the temps up to 220-230F after a bit.

Read more...

Best BBQ Beans

I started writing this post ages ago and just realized I’d never published it. It looks like the Purple Smoke site isn’t up any longer, but this is still a great BBQ bean recipe.

I've been making these beans for years and they're pretty tasty. My wife proudly declares that she hated BBQ beans until she tried mine. That said, I can't take credit for this recipe because it's based on the World's Best BBQ Beans recipe from the Purple Smoke competition BBQ team. I stumbled across Purple Smoke's website years ago and saved their recipe for BBQ beans and their World's Best BBQ Sauce.  I've made a few changes to the BBQ beans recipe over the years, so it's deviated a bit from the original.  The last time I tried to find the Purple Smoke website, it appeared they let their domain registration expire, so it may be difficult to find the original and it's also the reason I figured I should document my version here. 

One note, with all the bacon fat, this probably isn't the healthiest dish around, so I wouldn't recommend eating it on a daily basis but it's good for special occasions. Here's the recipe as I've been making it:

2 - 16oz cans Red Kidney Beans, drained
2 - 16oz cans Butter Beans, drained
2 - 16oz cans Pork 'n' Beans, do not drain
1# Bacon cut crosswise into 1/4" strips
2 - Large Yellow Onions, diced
2 - JalapeƱos, seeds and stems removed, diced
1c Ketchup
1c Your favorite BBQ Sauce
3oz Apple cider vinegar
2t Kosher salt 
3/4c Dark brown sugar, packed
4t Dry mustard 
Optional - If you have any leftover smoked meat, chop it and add up to a pound.

Process
Use a cast iron Dutch Oven or similar pot and cook the bacon over medium heat until crispy and the fat has been rendered.
Remove bacon and set aside on a paper towel reserving the drippings. 
Add chopped onion to the pot with the drippings and cook until translucent, about 5 mins.
Reduce heat to low and add chopped jalapeƱo.
Add the remaining ingredients and stir to combine.
Bake at 300F in your oven, grill, smoker, it crock pot until it bubbles, about 1 hour.

Read more...

Biscuits and Gravy

>> Sunday, December 08, 2024

Updated: Biscuit recipe added below:

I love some biscuits and gravy for breakfast. It’s so flavorful and filling and I’ll often skip lunch whenever we make it. So far I’ve usually just used canned biscuits, but I think I may start exploring biscuits from scratch. For the gravy, I’ve made a few different recipes that I’ve found on the internet, but the one I made today has been my fav so far.  Here’s the recipe as I made it:

1lbs Hot breakfast sausage (I used Tennessee Pride)
1.5t Rosemary, fresh 
1.5t Thyme, fresh 
1/2t Kosher salt (plus a bit more)
1.25t Ground black pepper
3T butter
1T Worcestershire sauce
1/2c All-purpose flour
2.5c Milk
2.5c Heavy whipping cream 

Notes: You can substitute 5c milk if you don’t have heavy whipping cream. 

Gravy Instructions 
  1. Brown the sausage over medium heat.
  2. Add Rosemary, thyme, salt, and pepper and mix well and cook for 2 minutes..
  3. Add butter and Worcestershire.
  4. Once butter melts, add flour and stir well.  Continue cooking for about 3 minutes, stirring so that the flour doesn’t burn.
  5. Add milk/cream and mix well.  Stir occasionally so it doesn’t burn on the bottom. 
  6. Once thickened enough to coat the back of a spoon, turn off the heat and cover.
  7. Bake your biscuits and once they’re ready, give the gravy a good stir.  
  8. Serve over hot biscuits.
Biscuits!
Here’s a really good biscuit recipe I found that goes great with the above gravy recipe. This is purportedly the biscuit recipe from Ruth’s Diner in Utah. If you’ve never been, their biscuits are ginormous and delicious. This recipe doesn’t get quite as high as the ones from Ruth’s, but I think that may have more to do with the shape of the pan used.  Here’s the recipe as I made it:

2.75c all purpose flour
1.5t kosher salt
1T sugar
1t baking powder
1t baking soda
6T butter, chilled and cut into small pieces
3/4c buttermilk
1 egg, beaten
1/4c water

Biscuit Instructions 
  1. Pre-heat oven to 425 degrees
  2. Combine flour, salt, sugar, baking powder, baking soda in a large bowl. Mix well
  3. Add chilled butter and use a pastry cutter and mix until crumbly.
  4. Add the buttermilk, beaten egg and water.
  5. Using a large utensil (I like to use a large wooden Spurtle) mix well using a folding motion.  Mix just long enough until wet and dry ingredients are blended.
  6. Transfer from bowl to lightly floured counter or cutting board and do a little more folding. If the dough is too sticky, add more flour, about one tablespoon at a time.
  7. Gently flatten out the dough to about 3/4” thick and cut out nine equal portions. I like to use a biscuit cutter to ensure uniform size.
  8. Bake in an 8x8 or 9x9 pan for about 17-18 minutes until lightly golden on top.

Split biscuits in half and top with sausage gravy and serve!


Read more...

Smoked Meatloaf and General Update

>> Sunday, November 24, 2024

I haven’t posted in a while. We moved from Utah to Florida and I had to dismantle my brew system and only take the essentials.  Some things like my brew stand didn’t make the cut, so I’m in the process of redesigning and rebuilding. 

In the meantime, here’s a smoked meatloaf recipe I made a couple days ago. It was awesome, and even my wife and son who don’t love meatloaf thought it was great. In hindsight, I wish I’d made two loaves so that we would have had enough for leftover meatloaf sandwiches. 

For this recipe I used the meatball/meatloaf blend that I picked up from Wild Fork. It’s a 1/3 each blend of beef, pork, and veal. I then supplemented it with 8oz of grass fed ground beef. For the BBQ sauce I used Kinder Hot BBQ sauce. Sadly I no longer have my Kamado smoker, but I picked up a Weber Searwood pellet smoker once we got settled in Florida. Here’s the recipe as I made it and credit to https://bakeitwithlove.com for the original recipe.

Ingredients
1.5 lbs Wild Fork Meatloaf Blend + 8oz Ground Beef
1/2c yellow onion (finely minced) 
2 large eggs
3 garlic cloves, minced
1/3c Kinder Hot BBQ mixed into the loaf
1/3c Kinder Hot for the glaze
½c Panko breadcrumbs
1t cayenne pepper
1t chili powder
1t salt
1t pepper

Instructions
  1. Preheat your smoker to 275°F using your favorite hardwood. I went with Bear Mountain Gourmet BBQ Blend.
  2. Combine all ingredients but the 1/3c sauce for the glaze; this will be added with one hour left in the cook. Mix just long enough that all ingredients are well combined.
  3. Form your loaf then place it onto a wire rack. I used a shallow aluminum pan underneath the wire rack to catch any drippings.
  4. Place the loaf in the smoker and cook at 275F for two hours. 
  5. At the two hour mark, brush the meatloaf with the 1/3c of BBQ sauce.  
  6. Continue in the smoker for another hour until the internal temp reaches 160F.  In my case, I ended up bumping the temp up to 300F for the last 15 minutes. 
  7. Pull it off the smoker and let it rest for a few minutes before slicing. 

Read more...

Fake/Faux 'Nduja

>> Monday, February 19, 2024


Another food recipe! Shout out to Beltex Meats who introduced us to 'Nduja a few years ago. While they do carry a different supplier's 'Nduja year 'round, my favorite is the one they make in house a couple of times per year. I remember they posted it on their IG account and I thought it sounded amazing. By the time we got there they only had a fist-sized piece left and we bought all of it. 

For the uninitiated, 'Nduja is a spicy, spreadable pork sausage from the region of Calabria in southern Italy. To me it's like a spreadable cross between salami and pepperoni. I was looking into making my own when I stumbled across this recipe for "fake" 'Nduja that sounded like it was super close to the real thing. We like to spread it on a slice of baguette, often with a slice of cheese. Add some of this to your next charcuterie board and you won't be disappointed.


The key ingredient for both real thing and this faux recipe is Calabrian hot red peppers. Those and the Fresno pepper may be the hardest things to find, but fortunately Calabrian hot red peppers can be found in specialty grocery stores and on Amazon. I had to substitute a red jalapeno for the Fresno pepper. 

Here's the recipe as I made it:

Yields about 1 1/2 cups 

Ingredients 
200g (7 oz) Boars Head Genoa salami, cut into cubes 
110g (4 oz) Volpi chopped uncured pancetta 
48g Bob's Red Mill Sweet Cream Buttermilk Powder 
28g Paprika 
1 medium Fresno pepper (sub red jalapeno if you can't find Fresno peppers), stemmed, seeded, and chopped
2 to 4 Calabrian hot red peppers in oil - drained, stemmed, chopped (start with 2, add more for more heat)
6g Kosher salt
1 -2T Olive oil (start with 1 and add another if needed)

Directions
  1. Add everything in a bowl and stir to roughly combine. You can also do this in your food processor, but I had a hard time getting the buttermilk powder mixed in uniformly. 
  2. Process in a food processor with a metal blade for about 30-40 seconds. If it seems too dry and crumbly, add a tablespoon of olive oil. It should resemble a coarse paste. You do not want it as smooth as a typical pate.
  3. Taste it and if you want more heat, add another Calabrian hot red pepper and process again to mix.
  4. Transfer to a small container and refrigerate to firm up.
Serve it with bread, crackers, and cheese. I've heard it's also great added to spaghetti sauce, but haven't tried that yet. 

Read more...

Canadian Bacon 2023

>> Sunday, December 17, 2023

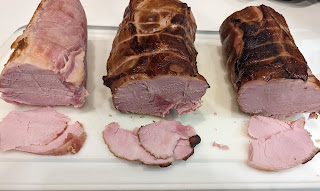
L to R, Irish, Canadian, Maple Canadian

I haven't posted much lately because I haven't brewed much lately. Long story short, too many things going on and I just haven't had the time to brew. That said, I have a few things planned so I should have a brewing post in the not too distant future. 

For today, I have a food-related post. I bought a pork loin and I'm going to be trying three variations on Canadian Bacon.  The first two are based on the recipe from Amazing Ribs and are essentially the same recipe, but one is Canadian style and one is Irish style with the Irish style being roasted in the oven rather than smoked. The last one is one I found online that sounded interesting so I thought I'd give it a try. I plan to use these in one of our favorite dishes, Eggs Benedict but will use them in other things like breakfast sandwiches, pizzas, etc.  

Canadian Bacon based on Amazing Ribs recipe
3.0# Pork Loin, about 3.5" thick

9.6 Cups RO water
8.74g Prague powder #1
90.0g Sugar
104g Kosher salt
5.83g Garlic powder
  1. Mix all ingredients and stir until salts and sugar are dissolved.
  2. Chill brine.
  3. Add loin to chilled brine and brine for 6.5 days in the fridge.
  4. Rinse the loin.
  5. Optional: truss your pork loin so that it ends up more round than oblong.  
  6. Smoke at 325F until the internal temp in the middle of the loin reaches 145F. I used apple wood and smoked it on my kamado smoker with acacia wood charcoal.

Read more...

Homemade Refried Beans

>> Monday, February 20, 2023

One more food-related post today. This one is for Homemade Refried Beans. This dish is super easy to make, it just takes a little bit of prep time, and while I don't think there's anything wrong with a can of Rosarita Refried Beans, these are definitely better.

These are great as a side dish (we had them with lobster tacos). They're also really good paired with a can of Stokes Ranchero Sauce for a semi-homemade take on huevos rancheros.

1# Dried pinto beans (or black beans)
2 T Vegetable or olive oil
1 Large sweet onion
6 Garlic cloves, minced
1/3 c Cilantro, chopped
1.5 t Chili powder (e.g. McCormick chili powder)
1.5 t Cumin
0.5 t Cayenne pepper
3 Cubes pork bouillon (substitute chicken or vegetable if you can't find pork)
2 T Lime juice
0,5 t Salt
Pepper
Water

Directions
  1. The day before, place dried beans in bowl and cover with 1" or so of water.  Allow to soak overnight.
  2. The next day, drain off any excess water.
  3. Using a large saucepot, heat oil over medium-low heat then add onion, garlic, cilantro, chili powder, cumin, and cayenne pepper. 
  4. SautƩ for about 15mins, remembering to stir frequently to avoid burning.
  5. Add beans to pot along with bouillon, 8 cups of water, and salt.
  6. Cover and simmer for 1.5 to 2.5 hours, stirring occasionally to avoid burning the beans on the bottom of the pot.
  7. Remove the lid and continue to simmer at least 15 minutes or the desired amount of liquid remains.
  8. Use a potato masher or hand blender to mash the beans to the desired consistency. 
  9. Stir in lime juice and add additional salt and pepper to taste before serving.

Read more...

Mexican Style Rice

Here's a Mexican-style Rice recipe I stumbled across recently when I decided to make lobster tacos for my wife's birthday dinner. I really liked how this turned out, so as usual, I'm posting the recipe here so that I don't run the risk of losing it. 

One thing I particularly like about this recipe, even though it incorporates tomato sauce, the finished product isn't saucy. Super saucy Mexican rice kind of grosses me out; if you feel the same way, give this one a try. One note, the first time I made it I didn't use low-sodium broth and I felt like it was too salty right after it came out of the pan. It seemed better the next day, like it had mellowed a bit. Either use low-sodium broth or skip the Kosher salt until you've had a chance to taste it.

2 c Long grain white rice
1/8 c Vegetable oil
8 oz Tomato sauce
6 Cilantro stems, chopped
1 t Kosher salt
1 t Minced garlic
4 c Low-sodium chicken broth
1/8 t Cumin
1/8 t Garlic pepper

Directions
  1. Heat oil in large pan over medium heat.
  2. Add rice and cook until golden brown
  3. Add remaining ingredients to pan, and mix well.
  4. Bring to a simmer then cover and simmer for 30-40 minutes or until all liquid has been absorbed.
  5. Fluff with a fork before serving.

Read more...

Chinese Take-out Fried Rice

Here's a really good Chinese Take-out Fried Rice recipe that I originally saw on a sub-Reddit a little while back. I've made it once so far and it's really good. It may look complicated, but it's actually a fairly simple dish to make. 


Credit to Jason Farmer for doing a bunch of research into the recipe and for documenting it very well on his YouTube channel. Here's the link and I recommend watching it all the way through before attempting the recipe. The key to this recipe is preparation. Things move quickly as you start cooking, so have everything ready to go before you start.
 
Ingredients - Here's everything you'll need. You'll only need small amounts of the soy sauces, so I'd recommend getting small-ish bottles rather than Costco-sized ones. Also, as noted in the video, you want Chinese style soy sauce, not Japanese style.
  • 2 parts standard long grain white rice
  • 1 part Jasmine rice
  • Lee Kum Kee or Pearl River Bridge light soy sauce
  • Lee Kum Kee or Pearl River Bridge dark soy sauce
  • Shaoxing Cooking Wine
  • Toasted Sesame Oil
  • 1 - Chicken breast
  • Baking Soda
  • Sugar
  • Corn Starch
  • Kosher Salt
  • MSG
  • Vegetable oil
  • Sugar
  • White pepper
  • 2 - Eggs, beaten
  • 1 - medium onion, diced
  • Diced carrot
  • Frozen peas
  • Bean sprouts 
Prepare Rice - The recipe calls for 2 cups of cooked rice. Since 1 cup raw rice is ~3 cups cooked rice, we need about 2/3 cup uncooked rice. That means 4/9 cup long grain white rice and 2/9 cup Jasmine rice. Since I've never seen measuring cups in the ninths, I just convert it to metric volumes. In this case it's 105ml of long grain white, and 52.5ml of Jasmine. Update: To be more precise, I converted volume to weight; use 47.3g Jasmine and 94.6g long grain white rice.
  • Wash rice under water until it runs clear.
  • Cook rice 1:1 with water (142ml)
  • Cool to room temp then chill overnight in the refrigerator.
Prepare Chicken
  • Slice chicken into small pieces.
  • Wash chicken under cold water and squeeze out excess water.
  • Add 1/2 t baking soda to chicken and mix in.
  • Add 1/2 t light soy sauce to chicken
  • Add 1/2 t sugar to chicken.
  • Add 1/2 t corn starch to chicken.
  • Add 1/4 t Kosher salt to chicken.
  • Add 1/8 t MSG to chicken
  • Add 1 t vegetable oil
  • Mix well and marinate from 15 mins to overnight.
Prepare Sauce Mixture
  • Combine the following ingredients in a small bowl:
  • 1/2 t sugar
  • 2 t light soy sauce
  • 1/2 t dark soy sauce. 
  • Stir until sugar is dissolved and set aside.
Prepare Dry Spice Mixture
  • Combine the following ingredients in a small bowl:
  • 1 t Kosher salt
  • 2 pinches of white pepper
  • 1/2 t MSG
  • Set aside
Prepare other ingredients
  • To 2 beaten eggs, add a pinch of kosher salt and a pinch of MSG.
  • 1/2 cup diced onion
  • 2 T diced carrots
  • 2 cloves garlic, chopped
  • 2 T frozen peas
  • Handful of bean sprouts
  • 2 T Shaoxing wine
  • 2 T sliced green onion
  • 1 T toasted sesame oil
Bring It All Together
  1. Heat wok, pan, or griddle over medium-high heat.
  2. Add 1 T vegetable oil to pan
  3. Turn heat down to medium and add eggs.
  4. Cook eggs for about 15-20 second then carefully move them around to start scrambling. 
  5. Cook eggs to slightly undercooked then transfer to a bowl.
  6. Add 1 T oil to pan
  7. Cook chicken to slightly undercooked then transfer to bowl with eggs.
  8. Add 1 T oil to pan
  9. Toss in diced onion and diced carrots.
  10. Cook for a minute or two until onion is beginning to look translucent, then add garlic and saute for an additional 30 seconds.
  11. Add 2 cups of the rice and stir constantly for about 2 minutes.
  12. Add chicken and eggs to mixture and incorporate well.
  13. Add sauce to mixture and incorporate well.
  14. Add dry spice mixture and incorporate well.
  15. Add frozen peas and bean sprouts, and gently mix them in.
  16. Deglaze with Shaoxing wine and immediately stir into rice. 
  17. Cook off the alcohol for about 20-30 seconds then turn off the heat.
  18. Add green onion and toasted sesame oil and mix in.
  19. Add salt and white pepper to taste.

Read more...

Spaghetti Pomodoro from The Bear

>> Sunday, December 25, 2022

This recipe is based on the red sauce as featured in the family dinners in the FX television series The Bear. Granted, I haven't made a whole lot of marinara recipes from scratch, but I really liked this sauce and it's way better than bottled sauces. This recipe is based on this YouTube video where real-life chef Matty Matheson and Courtney Storer from the show walk you through the process. I'd definitely advise checking out the video but if you're used to the typical step by step recipe instructions that you usually find on the Internet, it'll be a different experience. So, this is my attempt to translate the recipe into the more traditional format.


Ingredients
2 - 28oz cans Centro crushed tomatoes
6 tablespoons butter
1 yellow onion, halved
1 - 6oz can of Cento tomato paste
8-10 cloves garlic, chopped/minced/sliced 
Olive oil
Crushed red pepper
Kosher salt
Black pepper
Fresh basil
1 box spaghetti (I actually like angel hair pasta more)

Instructions
  1. Halve your onion and peel it. It's ok to trim a little off the top and bottom, but leave enough of the core on the bottom so that it holds together. You’re going to be removing the onion later, so this is why you want to keep it intact.
  2. To a medium/large pot, add a couple tablespoons of olive oil and heat over medium high heat.
  3. Add 6T butter to pot.
  4. Once the butter has started melting, add onion halves (flat side down).
  5. Add garlic and adjust heat as necessary so as not to burn the garlic.
  6. Add one or two "chef pinches" of kosher salt. (It's probably at least a teaspoon)
  7. Reduce heat to medium low.
  8. Add a pinch or more of crushed red pepper (more of you like some heat in your red sauce)
  9. Add anywhere from 3-6oz of tomato paste to the pot and cook it off for a few  minutes. This will help avoid the metallic character often associated with tomato paste.
  10. Tear a few basil leaves and add them to the pot. If you decide you want more basil, you can also add it later. 
  11. Add crushed tomatoes to pot. 
  12. Add about half a can (14oz) of water to the pot.
  13. Add a couple more chef pinches of kosher salt.
  14. Add black pepper to taste. I probably start at about 1 teaspoon worth, and go from there.  
  15. Stir to mix and taste.  If it's too acidic, add more salt (a little at a time).
  16. Continue to cook over low medium heat until the onions are fully cooked through and translucent.  I've let it go over an hour without any issues. Just remember to stir occasionally and make sure the heat is low enough that it doesn't burn/scorch the sauce.
  17. When the onion is cooked all the way through, remove the onions and discard. Taste the sauce again and add salt, pepper, and more fresh basil to taste. 
  18. Prepare your pasta per the package directions.
  19. In the video they combine the pasta and sauce then serve. I love a ton of sauce on my spaghetti but my wife likes less sauce on hers, so we add the sauce at serving time. 
Options
I love meatballs and this sauce goes well with them for spaghetti and meatballs or for a meatball sandwich. One time I added some crumbled spicy Italian sausage and it also was really good.

Read more...

Easy Chicken and Waffles

>> Sunday, November 27, 2022

I’m a breakfast guy, and I’ve been known to be a little grumpy in the morning if I don’t get something in my belly before starting my day. Sometimes it’s something as simple as a bowl of cereal or buttered toast with McCormick Salad Supreme Seasoning (trust me, I discovered this when I was a kid). On weekends I like to step it up a little and make a hot breakfast. 

Here’s an easy chicken and waffle recipe that I made over Thanksgiving weekend that turned out really well. This is more of a semi-homemade dish because for the chicken I’m using Just Bare Chicken Breast from Costco. These chicken patties and their chicken nuggets are a favorite around our house because they’re lightly breaded and seem much more like homemade chicken than most store-bought breaded chicken. 


Waffles

2 ¼ c All-purpose flour
1 T Baking powder
¼ c Sugar
½ t Kosher salt
1 t Cinnamon
2 eggs, separated
½ c Vegetable oil
2 c Milk
2 t Vanilla extract

  1. Combine flour, baking powder, sugar, salt, and cinnamon in a large bowl and mix well.
  2. Beat the egg whites with a mixer until stiff peaks form. Set aside.
  3. In a separate bowl, coming egg yolks, vegetable oil, milk, and vanilla extract. Whisk until well blended.
  4. Add the wet ingredients into the dry ingredients and mix until most of the lumps have disappeared.  Gently fold in the egg whites with a spatula.
  5. Cook the waffles in your waffle maker to desired doneness.  On mine, a setting of 3.5 on the dial that goes from 1-5 results in a golden brown crust.

Spicy Syrup 

1/2 c Honey or maple syrup
1 t Chile powder
1 t Kosher salt
1 Stick of butter

  1. Combine all ingredients in a small pan over medium heat. 
  2. Stir until butter is melted and all ingredients are well incorporated. 
  3. Reduce to low heat to keep warm until ready to serve.

Chicken
For the chicken, just prepare per package directions. I usually heat it in our air fryer.

To serve, slice chicken breast and arrange it on top of the waffle. Drizzle the chicken and waffle with the syrup and enjoy.

Read more...

Kalua-Style Pork

>> Thursday, October 08, 2020

Here's a recipe I did about a month ago and it turned out really well. Our son-in-law Tyrone recently suffered from a stroke and I'm making this dish especially for him as a welcome home treat. It was a scary situation but his rehab is going amazing and he's about to be discharged from the hospital, so I'm hoping this will taste better than the hospital food he's been eating.

This recipe is based on one posted on the Green Egg Blog. Don't skip the banana leaves; they add complexity.

Ingredients
  • 1 Pork Butt - 10-12 pounds with the bone in, or smaller if you can only find boneless
  • 2-4T Alaea Sea Salt (aka Hawaiian Red Sea Salt) - This is critical as a lot of the flavor is derived from the salt
  • 1T Liquid Smoke
  • Banana leaves
  • Butcher's Twine
Instructions
  1. Use a sharp knife to score the pork in a criss-cross pattern, cutting about 3/4" into the pork shoulder.
  2. Coat with liquid smoke*, then coat with Alaea sea salt. Don't be afraid to use more than 2T of salt.
  3. Wrap in banana leaves and secure with butcher’s twine. Note: To prepare the banana leaves, you'll want to remove the central stem/vein, then pass the leaves over a burner until they've become shiny and pliable.
  4. Smoke over charcoal and mesquite at 250F. After 2 hours, wrap tightly in foil then return to the smoker for the duration of the cook.
  5. Plan on a minimum of 1 hour per pound cooking time, then check temp and continue at 250F until you reach an internal temp of 190-200F.
  6. Pull the meat off the smoker and allow it to rest in the foil for at least an hour, but you can also wrap it in a towel and put it in a cooler for several hours.
  7. Pull pork for serving and reserve the juices…you’ll want to pour the juices back over your pulled pork.
*Normally I’d say it’s sacrilege to use liquid smoke on true BBQ. This is one case where I'd say it's ok. Basically it's just adding a little complexity, plus the banana leaves will reduce the smoke character.

The first time we made this, we served it as sliders on Hawaiian rolls, but it's also great over rice.

Read more...

The Tramp About Burger

>> Sunday, August 19, 2018

Burgers...they pair well with beer, they're a great summertime grilling option, and because everyone in my family likes them, we tend make them fairly often. A while back, New Belgium's blog had a burger recipe courtesy of one of their favorite food trucks, The  Tramp About. I made this recipe a while back and everyone loved it. The only thing I ended up changing a bit was I reduced the size of the patties because 7oz was a little too big for most of our kids. I have some nice big heirloom tomatoes ripening on the vine, so I figure it's a good time to make this recipe again. In my opinion, the tomato bacon jam and jalapeno aioli are what make this burger so great. A nice homegrown heirloom tomato doesn't hurt.

THE TRAMP ABOUT’S BACON JAM BURGER

JalapeƱo Aioli
4 cloves garlic
2T cilantro
2 jalapeƱos, deseeded
1T honey
1 lime, zested and juiced
2 egg yolks
2C canola oil
Salt and pepper to taste

Add all ingredients to food processor except for egg yolks, oil, salt and pepper. Process for 30-ish seconds. Add eggs and continue to process while slowly adding oil. Process until fully emulsified, then gently stir in salt and pepper.

Tomato Bacon Jam
0.5# bacon, preferably apple-smoked
2.0# canned diced tomato
1 yellow onion, diced
1C sugar
1C apple cider vinegar
1T salt
1T pepper


Cut bacon into 1/4" strips and cook on medium heat in a medium saucepan until fat is rendered. Add diced onion and cook until translucent. Add remaining ingredients and cook for about 45 minutes, stirring occasionally.

Assemble Burger
It's not rocket science here...patty + aioli + Romaine lettuce + slice of tomato + jam. The aioli and jam are kind off like crack...prepare to be addicted.

Read more...

Sous Vide Details and Tri Tip

>> Friday, May 25, 2018

One of my nephews is a chef and used to work at Haven Gastropub in Orange, CA. While there, he came up with a recipe for pork belly that was absolutely amazing. He described a process called sous vide, where they would cook the pork belly overnight in a water bath. Then before serving, the pork belly would be briefly seared in a hot pan, just enough to add some a thin layer of bacon-like crispness to the pork belly. It was served on a bed of greens and the low and slow cooking process resulted in a delicious fork tender dish that practically melted in your mouth.

Sous vide cooking is pretty well known now, but when I first tried my nephew's dish, it was a process I'd never heard of. I looked into it a bit and saw that there were several sous vide cookers on the market but I was hesitant to lay out the cash for one. They're pretty basic and usually consist of a heating element controlled by an electronic thermostat/switch that receives a signal from a temp probe. There's also some means for circulating water to ensure even temperatures throughout the water bath. It doesn't take a genius to realize this is very similar to my HERMS setup and how I use it for mashing grain. So I decided to do a trial sous vide cook using my brew system and some beef tenderloin steaks. The results were amazing and not too long after that, I bought an Anova Precision Cooker. Now you may ask, why did I buy one when my brew system worked so well? Well the brew system was a bit of overkill for what's needed (too much water, too much cleanup, etc.) and sometimes certain spices can permeate the plastic bags used for sous vide. I definitely didn't want any beefy off flavors in my beers, so I decided to buy a dedicated unit.

The process is pretty simple so I won't go into a ton of detail. Plus there is a  lot of info on the Internet, so there's no need to regurgitate what's already out there. Basically, you season your food, seal it in a bag, then cook it in the bag in a water bath at a given temp for a given period of time. This usually means low temps and several hours cooking time. The end result is very flavorful, juicy, tender meat (although it's not just for meat). Additionally, because of the low and slow method and the precise temp control, you end up with perfectly cooked meat all the all through (medium rare at our house for beef). That's right, no tough, chewy, dry over-cooked meat.

As for equipment, I use a food sealer, but there are ways to do it with regular zip lock bags. For the container, I use a Coleman Party Stacker cooler and cut a hole in the lid so I can insert the Anova.  Then it's just a matter of filling the cooler with the appropriate amount of water, bringing it up to temp, then adding your bagged food and setting the timer. It's worth mentioning, after the cook you still want to usually sear your meat. I use a hot cast iron pan on my grill for this. This gives you the flavors associated with grilled meats (maillard reactions) and without it, it's closer to boiled meat.

So like my brewing and other food related posts,  I post this kind of stuff do that I make sure I do it The same way each time. It also helps if I decide I want to tweak things. So today I'm doing a tri tip with Santa Maria seasoning. I recently discovered a butcher shop near my house (Don's Meats) and I've been buying my tri tip there. The butcher is awesome and the meats have been great, plus it's always nice to support local businesses. Tri tip is great as a main dish, but we also like to slice it thin for sandwiches which is what we'll be doing with this one.

As described above, I sealed the tri tip in a vacuum seal bag then cooked it in my sous vide setup at 134F for 3 hours. Minimum time for this is about 2 hours and maximum is about 6 hours. I've heard too long in the water bath can change the texture for the worse, so I'd recommend shooting for something between 2 and 4 hours. It was then removed and seared on each side for about 1 min per side (flipped every 30 seconds). That's about all there is to it...eat it or chill out to be sliced later.
Seasoned, bagged, and ready for a bath

 Hanging out in the water bath

Right after adding meat, the temp only dropped 1 degree

Read more...

Smoked Turkey Stock Ramen

>> Sunday, December 03, 2017

I was talking with a friend of mine at work before Thanksgiving and he mentioned how his family makes stock from their leftover turkey carcass. I remember my mom doing this when I was little. I googled some recipes and it's super easy, so I decided to give it a try.

This was kind of a two part process for me because I wasn't sure exactly how I was going to use it and I didn't really set out to do ramen. We smoked two bone-in turkey breasts for Thanksgiving this year. I would guesstimate that you either need two of these, or an entire turkey carcass. My family prefers white meat, so that's why we had the two breasts rather than one whole turkey. I was a little concerned about the smoke being overpowering, but it wasn't at all.

Smoked Turkey Stock
2 - Smoked bone-in turkey breasts, skin, scraps, etc, bones broken enough that it will fit in your stock pot
2 - Large onions, quartered
4 - Celery stalks, chopped
4 - Large carrots, peeled and chopped
1t Whole black peppercorns

Add all ingredients to your stock pot and add water to cover. Bring to a boil then reduce to simmer and let it ride for about 3.5 hours. Stain using a fine sieve. Chill and store in the fridge. Should yield around 2 quarts.

Ramen with Smoked Turkey Stock
2qts Smoked Turkey Stock
6 - Garlic cloves
1 - Lemongrass stalk, chopped
1 - Jalapeno, sliced
2 inch piece of ginger, peeled and chopped
1 bunch of cilantro stems, chopped
5t Hon-dashi powder
5t Soy sauce
Baby boc choy, quartered
Eggs
Cilantro leaves
Ramen noodles, preferably fresh
Shiitake mushrooms, sliced

Prepare Broth
Combine Turkey Stock, garlic, lemon grass, jalapeno, ginger, and cilantro stems. Bring to a boil, then reduce to a simmer for about an hour. Strain broth and discard solids. Add mushrooms, hon-dashi, and soy sauce, keep warm.

Prepare the Eggs
Fill saucepan with enough water to cover eggs but don't add eggs yet.Bring water to a boil and add eggs straight from the fridge.Boil/simmer for about 7.5 to 8.5 minutes. At my altitude in West Jordan, Utah, I let them go for about 8.5 minutes which yields a barely set yolk.Transfer eggs to a bowl of ice water to halt the cooking process.Peel, halve, and set aside.

Prepare Bok Choy
Place bok choy in salted boiling water for about 1 minute. Remove and allow to drain.

Prepare Noodles
Prepare noodles per package instructions. The most recent ones I used called for cooking 1-2 minutes. I'd recommend erring on the short side as cooking too long will result in mushy noodles. Assemble immediately.


Assembly
Add noodles to bowl and ladle broth over noodles. Add bok choy. Add eggs. Add cilantro leaves. Enjoy!


Read more...

French Toast

>> Sunday, October 15, 2017

Time for a food post.  This is my favorite French toast recipe and it's based on Alton Brown's French Toast Recipe. I like to use Harmon's Challah bread or their White Chocolate Pecan bread.  Challah is probably closer to traditional French toast, but the White Chocolate Pecan is really good too.

1 cup half-and-half
3 large eggs
2 tablespoons honey, warmed in microwave for 20 seconds
1/4 teaspoon salt
1/4 teaspoon cinnamon
1/2 teaspoon vanilla extract
A pinch of nutmeg
Bread, about 8 slices
4 tablespoons butter 

Preheat oven to 375F. Combine half-and-half, eggs, honey, salt, cinnamon, vanilla, and nutmeg in a medium bowl and whisk to combine. The cinnamon has a tendency to float on top...don't worry if this happens, just mix it enough that there isn't any huge clumps. 

Dip slices into mixture and let it soak for up to 30 seconds per side (I usually do about 10 seconds). Place bread on a cooling rack over a cookie sheet and allow them to "drip dry" for about a minute. Melt 1T of butter over medium to medium-low heat and cook toast 2-3 minutes per side, until golden brown. Transfer to the oven and bake for an additional five minutes, then serve with butter and maple syrup. Repeat until all slices are cooked.

Read more...

Pork Belly Burnt Ends

>> Sunday, May 28, 2017

I thought I'd post about a dish I made back on Mother's Day that everyone liked so much, I decided to make it again for a Memorial Day BBQ we're going to. If you're a fan of BBQ, you've probably had burnt ends, which comes from the fattier cut from the brisket point. Usually they're made by separating the point from the flat when the flats are cooked and good to go. The point is returned to the smoker and continues to cook to render more fat and to continue to break down the collagen. The bark continues to develop as well and you end up with a delicious cut of meat that is definitely different from the leaner flat of the brisket. This recipe is essentially a take on burnt ends style but using pork belly instead of brisket.

I stumbled across this recipe on Instagram. It was one of those "you may like" videos. Like I said, we gave it a try on Mother's Day along with some smoked chicken and ribs and this was by far the crowd favorite...we definitely liked. And as far as smoking meats go, it was a pretty easy process. Because of the high fat content, this is a forgiving meat to smoke. I want to point out, this stuff contains a lot of fat...a lot! It's probably something you should only make every once in awhile, and you should probably pair it with something healthier like a salad. As most people know, pork belly is where bacon comes from, so eating a half pound of this is essentially the same as eating a half pound of bacon. Ok, enough on the warnings.  

I found a couple recipes out there, but the one I followed was from Vindulge. It's documented very well with easy step-by-step instructions and it's worth checking out. The first time I made it, I used half a pork belly because I'm always cautious when trying out new recipes and I figured my health-conscious wife would rather eat the smoked chicken I made along with the pork belly. This time there's a larger group so I'm making a full belly. The first time I made it, I went with Weber's Chicken 'N Rib Seasoning. This rub used to be sold under the Durkee brand as Chicken 'N Rib Rub and is one of my favorite dry rubs. For this second batch, I decided to try Rufus Teague Spicy Meat Rub; not because I didn't like the Weber rub, just because I wanted to try a different rub. For the sauce I went with Famous Dave's Sweet and Zesty as it's always been a favorite of my wife. For smoking wood, I used a blend of hickory and apple wood.

Recipe and Process
  1. If your belly comes with skin on, trim it off along with any excess fat from the skin side. 
  2. Cut your pork belly up into 1.5-2" sized cubes.
  3. Season each piece with your rub making sure to coat all sides.
  4. Bring your smoker up to 230F.
  5. Lightly oil your smoker's grates to prevent sticking and arrange the cubes leaving space between them for the smoke to circulate (make sure they aren't touching).
  6. Smoke for about three hours at 230F.
  7. Transfer cubes to disposable aluminum pan.
  8. Add about 1 cup BBQ sauce, 2T honey and stir to mix and coat cubes.
  9. Add about half a stick of butter cut into squares.
  10. Cover with foil and return to smoker for another 60-90 minutes.
  11. Remove foil and cook another 15 minutes, stirring occasionally to make sure the cubes are evenly coated.
  12. The sauce should have thickened a bit at this point, so remove from smoker and serve.
Before adding sauce

Read more...

Texas Style Smoked Sausage #1

>> Sunday, March 12, 2017

We recently went to visit our friends in Houston, Texas and as part of that trip, we did a quick little getaway to Austin. We visited Jester King which was a lot of fun although I have to admit there was a couple of their beers that had a bit too much sweat sock/smelly high school locker room character for my liking...and this is from a guy that is a huge sour and wild beer nerd.

We also stopped into The Salt Lick BBQ for a late lunch/early dinner before we went to Jester King. As you can also probably tell from my food-related posts, I really like good BBQ, smoked foods, and smoked beer. We tried the brisket, pulled pork, ribs, and smoked sausage at The Salt Lick and everything was awesome. The sausage was seasoned perfectly, not too much that the spices overpowered the meat and smoke; it inspired me to try to make something similar at home.

My disclaimer, definitely read up on sausage making before you try it for the first time. You don't want to accidentally poison anyone with botulism.

The recipe I'm basing mine off of is apparently from Smitty at Kruez Market in Lockhart, Texas and was published in the book "Texas on the Half Shell”. Another recipe I plan to try is this one based on The Salt Lick's sausage. Here's the recipe I used today and some details on process:

9.0 # Beef Chuck
1.0 # Pork Shoulder
62.4g Kosher Salt
42g Black Pepper, coarsely ground
1.77g Cayenne Pepper
11g Cure #1 (not used in the original recipe, but needed since we're smoking at low temps)
136g Powdered Milk mixed with 12oz Ice cold water (the original called for cereal binder)

Cut the meat up into grinder-sized pieces and sprinkle kosher salt, black pepper, cayenne pepper, and cure #1. Run them through your 5/8" (coarse) grinding plate. I should mention, when grinding meat, you want it cold...not frozen, but very cold. If needed, return meat to the freezer to make sure things stay nice and chilled. Run the meat through the coarse plate a second time then add water and powdered milk and mix well. Stuff into medium hog casings.

Allow sausages to dry for a bit then smoke at 130F for 4-ish hours. Poach the sausages in 165F water until they reach an internal temp of 154F. Chill in an ice water bath then allow them to bloom at room temp for an hour or two. To serve, you grill over indirect heat until heated through and the casing is cooked to your liking. I'm planning on throwing mine in my kamado for a little extra smoke character.

Read more...

Really Good and Easy Semi-Homemade Ramen Soup

>> Monday, January 02, 2017

Time for a food post. I've been craving ramen lately. No, not the cheap cup o' noodles or the ones with the little packet of seasoning (that all seem to taste exactly the same regardless of their flavor). No, I wanted something with a little more complexity than standard grocery store ramen.

As with most really good soups, the key to good ramen is the broth and most authentic recipes involve preparing it at least a day in advance. While tasty, most of us don't have that kind of time on our hands and/or don't manage to plan far enough ahead to have authentic broth ready when the ramen-hankering hits.

I decided to search out some "quick" ramen recipes that were a level above the cheap packaged ramen that many college students have survived on for years. This recipe is my favorite so far; very tasty while still quick and easy. Here's the original source for the recipe, however I noticed some questionable activity on this domain if you stay on the page too long (e.g. spoofed Google Chrome updates). I'm wary of any site that exhibits that kind of behavior and because recipes that I really like tend to vanish from other sites, I'm documenting it here for my own sake.

Yield: 4 servings
Total prep time: 30-45 minutes

8 Slices bacon, chopped - I recommend the savory Asian bacon that I made here.
2-inch piece of fresh ginger, peeled and sliced
6 Garlic cloves, just crush them with the side of a knife
2 T Lemongrass, chopped
2 T White miso paste - I used Miso & Easy because that's what my local grocery store carried
1 t Red pepper flakes - this provides a fair amount of heat...noticeable, but not over the top.
64 oz Low-sodium chicken broth
4 T Low-sodium soy sauce
1 T Balsamic vinegar
1 T Rice wine vinegar
4 t Toasted sesame oil
Dried ramen noodles - I used Hime Ramen Noodles (pic below)
1-2 Shallots, thinly sliced
4 Soft-boiled eggs, peeled and halved
1 c Green onions or scallions, chopped

Prepare the Broth
  1. Cook bacon in a pot over medium heat until crispy. If using the Asian bacon recipe, definitely do not cook any higher than medium heat or it will burn. Flip it about once per minute until crispy.
  2. Remove half the bacon and place on paper towel. Reserve the rest of the bacon and the drippings in the pot.
  3. Reduce heat to medium-low and add the ginger, garlic, and lemongrass to the reserved bacon and drippings. Cook for 1 minute.
  4. Add miso paste, red pepper, and chicken broth.  Cover, bring to a simmer, and hold it at a simmer for 30 min.
  5. After 30 minutes, strain out and discard the solids (bacon, ginger, garlic, lemongrass, and ree pepper flakes). 
  6. Add soy sauce, vinegars, and toasted sesame oil.
  7. Keep warm until ready to serve
Prepare the Eggs
  1. Fill saucepan with enough water to cover eggs but don't add eggs yet.
  2. Bring water to a boil and add eggs straight from the fridge.
  3. Boil/simmer for about 7.5 to 8.5 minutes. At my altitude in West Jordan, Utah, I let them go for about 8.5 minutes which yields a barely set yolk.
  4. Transfer eggs to a bowl of ice water to halt the cooking process.
  5. Peel, halve, and set aside.
Prepare Noodles
Follow package directions, but generally speaking you'll want to boil the noodles in water for about 3 minutes.

Final Assembly
  1. Add cooked noodles to bowl. 
  2. Ladle broth over noodles.
  3. Add shallots, green onions, bacon, and halved eggs.
  4. Serve immediately.
This is the miso I used

These are the noodles I used

Read more...